we ship to:
Shipping to AustraliaShipping to AustriaShipping to BelgiumShipping to BulgariaShipping to CanadaShipping to ColombiaShipping to Costa RicaShipping to CroatiaShipping to Czech RepublicShipping to DenmarkShipping to EstoniaShipping to FinlandShipping to France, MetropolitanShipping to GermanyShipping to GreeceShipping to IndiaShipping to IrelandShipping to ItalyShipping to JapanShipping to LatviaShipping to LithuaniaShipping to MexicoShipping to NetherlandsShipping to New ZealandShipping to NorwayShipping to PolandShipping to PortugalShipping to RomaniaShipping to Saudi ArabiaShipping to SingaporeShipping to Slovak RepublicShipping to SloveniaShipping to SpainShipping to SwedenShipping to SwitzerlandShipping to TurkeyShipping to United Kingdom
How to Scan a Mac for Viruses

How to Scan a Mac for Viruses

Posted By Volodymyr Chubei | 27 Aug 2024

Table of Contents


Viruses and malware can pose serious threats to any computer, including Macs. Despite macOS having built-in virus protection, this does not guarantee complete safety. Many users mistakenly believe that their Mac is immune to hacking attacks, but this is not the case. Malicious software can infiltrate your computer through software vulnerabilities, phishing emails, or infected websites. In this article, we will discuss in detail how to scan for viruses on a Mac, the signs indicating a potential infection, and how to protect your computer from potential threats.

What is a Mac Virus? Signs of macOS Infection

A virus on a Mac is a malicious program that can cause significant damage to your computer. These programs can steal personal data, spy on your activities, display intrusive ads, and even completely block access to your computer. Viruses can spread through various means, such as infected websites, email attachments, torrent files, or even USB drives.

Signs of macOS infection can include:

  • Sudden decrease in computer performance. If your Mac is running significantly slower than usual, it may indicate the presence of a virus consuming system resources. You may notice that applications take longer to launch, and web pages load more slowly. Sometimes, an infected Mac may spontaneously restart or freeze, overheat more than usual, and deplete its battery faster due to CPU resource usage.
  • Appearance of new browser extensions you did not install. Malicious programs often install their extensions in your browser to track your activities or display ads. If you notice new toolbars, pop-up windows, or changes in the default search engine that appeared without your consent, it could be a sign of infection.
  • Change of browser homepage without your consent. If your homepage suddenly changes to an unknown site, it might indicate an infection. Malicious programs can alter browser settings to redirect you to sites that distribute ads or even more malware.
  • Pop-up ads and security warnings. Viruses frequently use pop-ups to spread ads or fake security warnings, prompting the user to install additional malware. If you see numerous pop-up windows, especially ones offering software updates or virus warnings, be cautious.
  • Inability to access personnel files. Some types of viruses, known as ransomware, encrypt your files and demand a ransom to restore access. If you suddenly find that you cannot open your documents, photos, or other important files and see a message demanding payment, your Mac is likely infected with ransomware.
  • Redirection to unknown websites when trying to open specific pages. Viruses can change DNS settings or the host file to redirect you to malicious or ad sites. If you try to open a familiar website and end up on a wholly different page, it could be a sign of infection.
  • Appearance of new user accounts. Some viruses can create new user accounts on your Mac to gain access to the system and your data. If you find unknown accounts in the “Users & Groups” section of system settings, this is a clear sign of malicious activity.

If you notice one or more of these signs, do not panic but immediately scan your Mac or viruses. The sooner you detect and remove malicious software, the less damage it can cause to your computer and personal data.

However, it's important to remember that not all viruses manifest themselves clearly. Some malicious programs are designed to remain unnoticed and work in the background, collecting your data or using your Mac's resources for their purposes. Therefore, even if you do not observe obvious signs of infection, regular Mac virus scans are a good habit to ensure your computer's security.

In the next section, we will explore various methods to scan a Mac for viruses using both built-in macOS tools and third-party antivirus programs.

Also: How to secure your Mac on the Internet: 7 tips

How to Run a Virus & Malware Scan On a Mac Automatically

There are many antivirus programs available that allow you to check for malware on a Mac automatically. This software uses regularly updated databases of known threats to detect and remove malware. They provide more comprehensive protection than macOS’s built-in tools, as they can find not only known viruses but also new, undiscovered threats using heuristic analysis and machine learning.

Next, we will review some of the most popular and reliable antivirus solutions for Macs and provide step-by-step instructions for installing and using them.

Avast Free Antivirus: Fast and Reliable System Virus Detection on Mac

Avast Free Antivirus is a no-cost antivirus program that offers dependable protection against viruses and malware. It employs advanced threat detection technologies, including behavioral analysis and machine learning. Additionally, Avast provides supplementary features such as browser protection, Wi-Fi vulnerability scanning, and even a basic VPN for secure internet browsing.

To scan your Mac using Avast Free Antivirus:

  1. Download the Avast Free Antivirus installation file from the official Avast website.
  2. Open the downloaded file and double-click the installer.
  3. Follow the on-screen instructions to install the program. You will need to enter your administrator password for the installation.
  4. After installation, open Avast Free Antivirus from the “Applications” folder.
  5. Click the “Scan” button on the main screen of the program.
  6. Select the type of scan: quick, full, or custom (to scan specific files or folders).
  7. Wait for the scan to complete. Avast will provide a report on detected threats.
  8. Follow the program's instructions to remove or quarantine any detected viruses.

Avast also offers an automatic scanning feature that checks your Mac for threats in the background without interrupting your work. You can set up a schedule for automatic scans in the program settings.

Check for Malware on Mac with AVG Antivirus for Mac

AVG Antivirus for Mac is another no-cost antivirus solution that provides protection against viruses and malware. It offers real-time protection against malicious websites, downloads, and emails. AVG also includes a “Wi-Fi Inspector” feature that scrutinizes your network for vulnerabilities and helps safeguard your data from potential threats.

To scan your Mac using AVG Antivirus:

  1. Download the AVG Antivirus for Mac installation file from the official AVG website.
  2. Open the downloaded file and drag the AVG icon to the “Applications” folder.
  3. Open AVG Antivirus from the “Applications” folder and click “Continue” in the welcome window.
  4. Click the “Scan Now” button on the main screen of the program.
  5. Select the type of scan: quick, full, or custom.
  6. After the scan completes, AVG will show a list of detected threats.
  7. Follow the program's recommendations to remove or quarantine the viruses.

AVG also provides real-time protection that intercepts potential threats before they can harm your Mac.

Bitdefender Virus Scanner for Mac: A Lightweight Mac Virus Scan Solution

Bitdefender Virus Scanner for Mac is a no-cost virus scanner that delivers prompt and efficient scanning of your Mac for threats. It utilizes cloud technologies to detect the newest viruses and malware. Bitdefender is renowned for its advanced threat detection algorithms and consistently receives high ratings in independent antivirus tests.

Here’s how to run a virus scan on your Mac using Bitdefender Virus Scanner:

  1. Download the Bitdefender Virus Scanner for Mac from the official Bitdefender website.
  2. Open the downloaded file and drag the Bitdefender icon to the “Applications” folder.
  3. Open Bitdefender Virus Scanner from the “Applications” folder.
  4. Click the “Scan” button on the main screen of the program.
  5. Wait for the scan to complete. Bitdefender will display a list of detected threats.
  6. Follow the program's instructions to remove any detected viruses.

Note that Bitdefender Virus Scanner does not provide continuous real-time protection but serves for on-demand scanning. For ongoing protection, consider using the paid version of Bitdefender Antivirus for Mac.

Avira Free Security for Mac: Check for Malware on Mac with Ease

Avira Free Security for Mac is a no-cost antivirus package that provides comprehensive protection for your Mac against viruses and malware. It encompasses an antivirus scanner, real-time protection, web protection, and performance optimization tools. Avira utilizes advanced threat detection technologies, including heuristic analysis and cloud-based virus databases.

To scan your Mac using Avira Free Security:

  1. Download the Avira Free Security for Mac installation file from the official Avira website.
  2. Open the downloaded file and double-click the installer.
  3. Follow the on-screen instructions to install the program. You will need to enter your administrator password.
  4. After installation, open Avira Free Security from the “Applications” folder.
  5. Click the “New Scan” button on the main screen of the program.
  6. Select the type of scan: quick, full, or custom.
  7. Wait for the scan to complete. Avira will provide a report on detected threats.
  8. Follow the program's recommendations to remove or quarantine the viruses.

Avira Free Security also offers a “Scan Scheduler” feature that permits you to establish regular automatic checks of your Mac for viruses.

Utilizing any of these antivirus programs will assist you in automatically scanning your Mac for viruses and provide a higher level of protection than the Mac virus scan built-in solutions. Nonetheless, bear in mind that even with antivirus software installed, it is crucial to adhere to basic computer security practices, such as downloading files solely from trusted sources, regularly updating software, and employing strong passwords.

In the subsequent section, we will explore how to scan Mac manually for viruses using macOS's built-in tools. This can be advantageous if you opt not to install third-party antivirus software or desire to conduct an additional check on your computer.

How to Scan for Viruses on a Mac Manually

This process necessitates technical knowledge and attention to detail but can be efficacious in detecting potential threats. Manual scanning entails inspecting active processes, installed applications, browser extensions, and other system components for suspicious activity.

To perform a manual system virus detection on Mac, follow these steps:

  1. Open Activity Monitor: located in the “Applications” → “Utilities” folder. This tool displays all active processes on your Mac, including those potentially associated with malware. Examine the list of running processes for suspicious names or processes consuming a significant amount of CPU or memory. Pay particular attention to processes with names resembling legitimate applications but with slight discrepancies (e.g., “Finder_” instead of “Finder”). If you encounter a suspicious process, select it and click the “X” button at the top of the window to terminate it.
  2. Check the Applications folder: search for unknown or suspicious programs. Thoroughly review the list of installed applications and make note of any you did not install or do not recall installing. Some malware may masquerade as legitimate applications, such as Adobe Flash Player or system updates. If you identify a suspicious program, move it to the trash. Remember to also inspect folders within the “Applications” folder, such as “Utilities” and “Startup Items”, as malware can conceal itself there as well.
  3. Inspect browser extensions: remove any you did not install or that appear suspicious. Malicious extensions can modify browser settings, exhibit unwanted ads, or even pilfer your personal data. In Safari, access “Preferences” → “Extensions” and review the list of installed extensions. Eliminate any unknown or unnecessary extensions by clicking the “Uninstall” button. In Google Chrome, navigate to “Settings” → “Extensions”, and in Mozilla Firefox, go to the “Add-ons” menu. Similarly, remove any suspicious extensions.
  4. Use Time Machine: Create a system backup before removing potential threats. Connect a formatted external drive, open “System Preferences” → “Time Machine”, select the disk, and turn on Time Machine. To restore files, use the Time Machine menu. This allows you to restore important files if something goes wrong during the virus removal process.

Additionally, check the following locations on your Mac for suspicious files or folders:

  • ~/Library/LaunchAgents
  • ~/Library/Application Support
  • ~/Library/Caches
  • /Library/LaunchAgents
  • /Library/LaunchDaemons
  • /Library/Extensions

If you find files or folders with unfamiliar names at these locations, try to find information about them online. If it turns out they are associated with malware, delete them.

Moreover, check your login items for suspicious entries. Open “System Preferences” → “Users & Groups” and go to the “Login Items” tab. Review the list of items in the “Login Items” section and remove any unknown or unnecessary entries.

Checking for Viruses and Malware on a Mac Online

When searching for information about viruses on your Mac, you may encounter offers to check your computer for malware online. However, it is important to understand that such offers are often fraudulent and may pose a threat to your Mac's security. Here are several reasons why you should not trust online virus scans:

  • Websites do not have direct access to your Mac's file system, so they cannot perform a thorough virus scan.
  • Online scanners may be used to distribute malware under the guise of antivirus solutions.
  • Some fraudulent websites may simulate virus detection to prompt you to download unnecessary or malicious software.
  • Granting control of your Mac to unknown websites can lead to theft of personal data or further infection of your computer.

Instead of relying on dubious online scanners, use reliable antivirus software installed directly on your Mac. Download antivirus programs only from the official websites of the developers or from the App Store.

Why You Should Regularly Scan for Viruses on Mac

Regularly scanning your Mac for viruses and malware is an important part of your overall computer security strategy. Here are several reasons why you should know how to check if Mac has virus and make it a habit:

  • Protection of personal data. Viruses can steal confidential information such as passwords, financial data, and personal documents.
  • Prevention of data loss. Some types of malware, such as ransomware, can encrypt your files and demand a ransom for their restoration.
  • Ensuring system stability. Viruses can slow down your Mac's performance, cause crashes, and create application errors.
  • Prevention of virus spread. An infected Mac can become a source of malware distribution to other computers on the network.

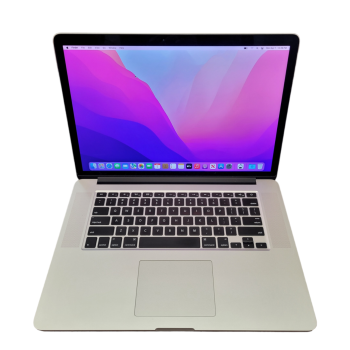
If you discover that your MacBook has been infected with a virus and sustained damage, do not despair. At Techtoro.io, you will find a wide range of original and used parts for various MacBook models. Qualified specialists will help you select the necessary parts and perform the repair of your computer.

Additionally, if your MacBook is outdated, or you decide to upgrade to a new model, Techtoro.io offers a buyback service for used MacBooks. You can sell your old computer and receive funds for the purchase of a new one. This is a convenient and eco-friendly way to upgrade your Mac without spending extra money. For more information about selling MacBooks, visit Techtoro.

Remember, prevention is always better than cure. Regular virus scans, timely software updates, and careful handling of your MacBook will help extend its lifespan and avoid issues related to malware. And if something goes wrong, Techtoro.io is always ready to help provide quality repair and maintenance services for your beloved Mac.


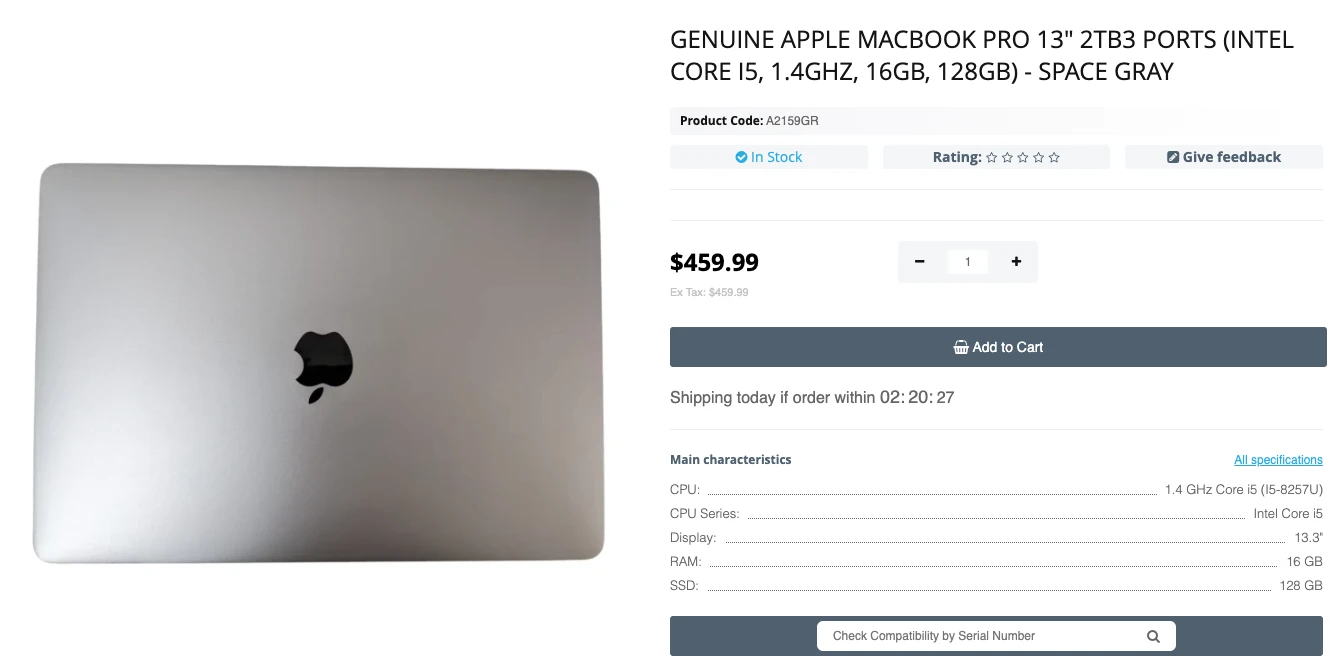
Genuine Apple Macbook Pro 13" 2tb3 Ports (Intel Core I5, 1.4ghz, 16gb, 128gb) - Space Gray

FAQ

1. How do I check my Mac for viruses?
To check your Mac for viruses, you can use built-in security tools like Gatekeeper and XProtect, or install reliable third-party antivirus software and run a full system scan.
2. Does Mac have an antivirus scan?
Yes, Mac has built-in tools for protecting against malware, such as Gatekeeper, which verifies downloaded applications, and XProtect, which scans the system for known threats. However, for more comprehensive protection, it is recommended to use specialized antivirus software.

ABOUT THE AUTHOR

Volodymyr Chubei
Computer Repair Specialist at TechToro.io


Volodymyr was born in Ukraine and has found his passion for electronics from his childhood. At the age of 13, he was capable of soldering some basic elements of a logic board and today he is one of the co-founders of TechToro.io

Latest Posts

How to Fix iMessage Not Working on Mac

How to Fix iMessage Not Working on Mac

In this article, we'll look at the main reasons why iMessage doesn't work o...
Read More

27 Aug 2024
Best MacBook Tools: What Apple Toolkit You Need for Repairs, Upgrades

Best MacBook Tools: What Apple Toolkit You Need for Repairs, Upgrades

In this article, we'll explore the best MacBook Tools needed to successfull...
Read More

30 Aug 2024
How to Check Storage on MacBook: 6 Ways

How to Check Storage on MacBook: 6 Ways

A lot of information is stored on internal drives of computers, and in case...
Read More

27 Aug 2024
macOS Sequoia: Release Date, Features, How to Download It

macOS Sequoia: Release Date, Features, How to Download It

In this article, we will take a closer look at the new macOS Sequoia, which...
Read More

12 Oct 2024